Problem
When a page is published to Experience Edge, the publish connector generates a dependency graph to make sure that all page items that are affected by a content change are published correctly. This is because publishing a page creates a snapshot of the content and caches that on Experience Edge*.
This dependency graph can grow very large depending on your information architecture and this can cause performance issues when publishing the site.
* This applies to the V1 release of the Experience Edge connector. The V2 connector will publish references to the datasource items, and the layout response will be composed at the edge on request.
Solution
We can solve this problem by changing how the layout for common page sections is composed. Instead of having a single layout for the page that includes the header and footer, we can create special routes for each common section and then use the web application to compose the page layout.
In this recipe, we will be focusing on headers and footers, but the same approach can be used for other common page sections.
Setting up the layouts
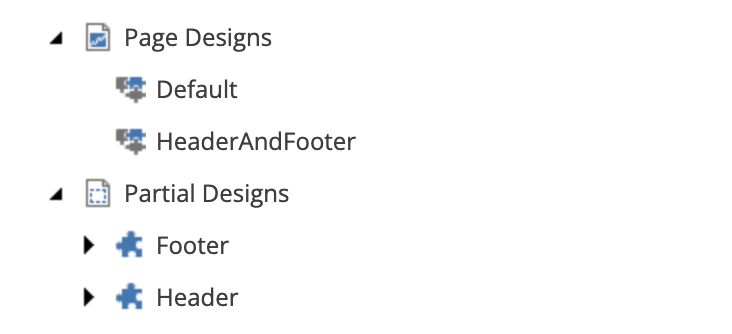
First, we need to create routes for each of the common page sections. We can do this by using the existing partial design paradigm in SXA. If you have already created a partial design for the header or footer, we can reuse those, otherwise we can create a new partial design for each of the common page sections.

Once we have created the partial designs, we need to create 2 page designs. One that defines what will be rendered on the main page, and one that defines what will be rendered on the header and footer. We will call these default and header-footer respectively.
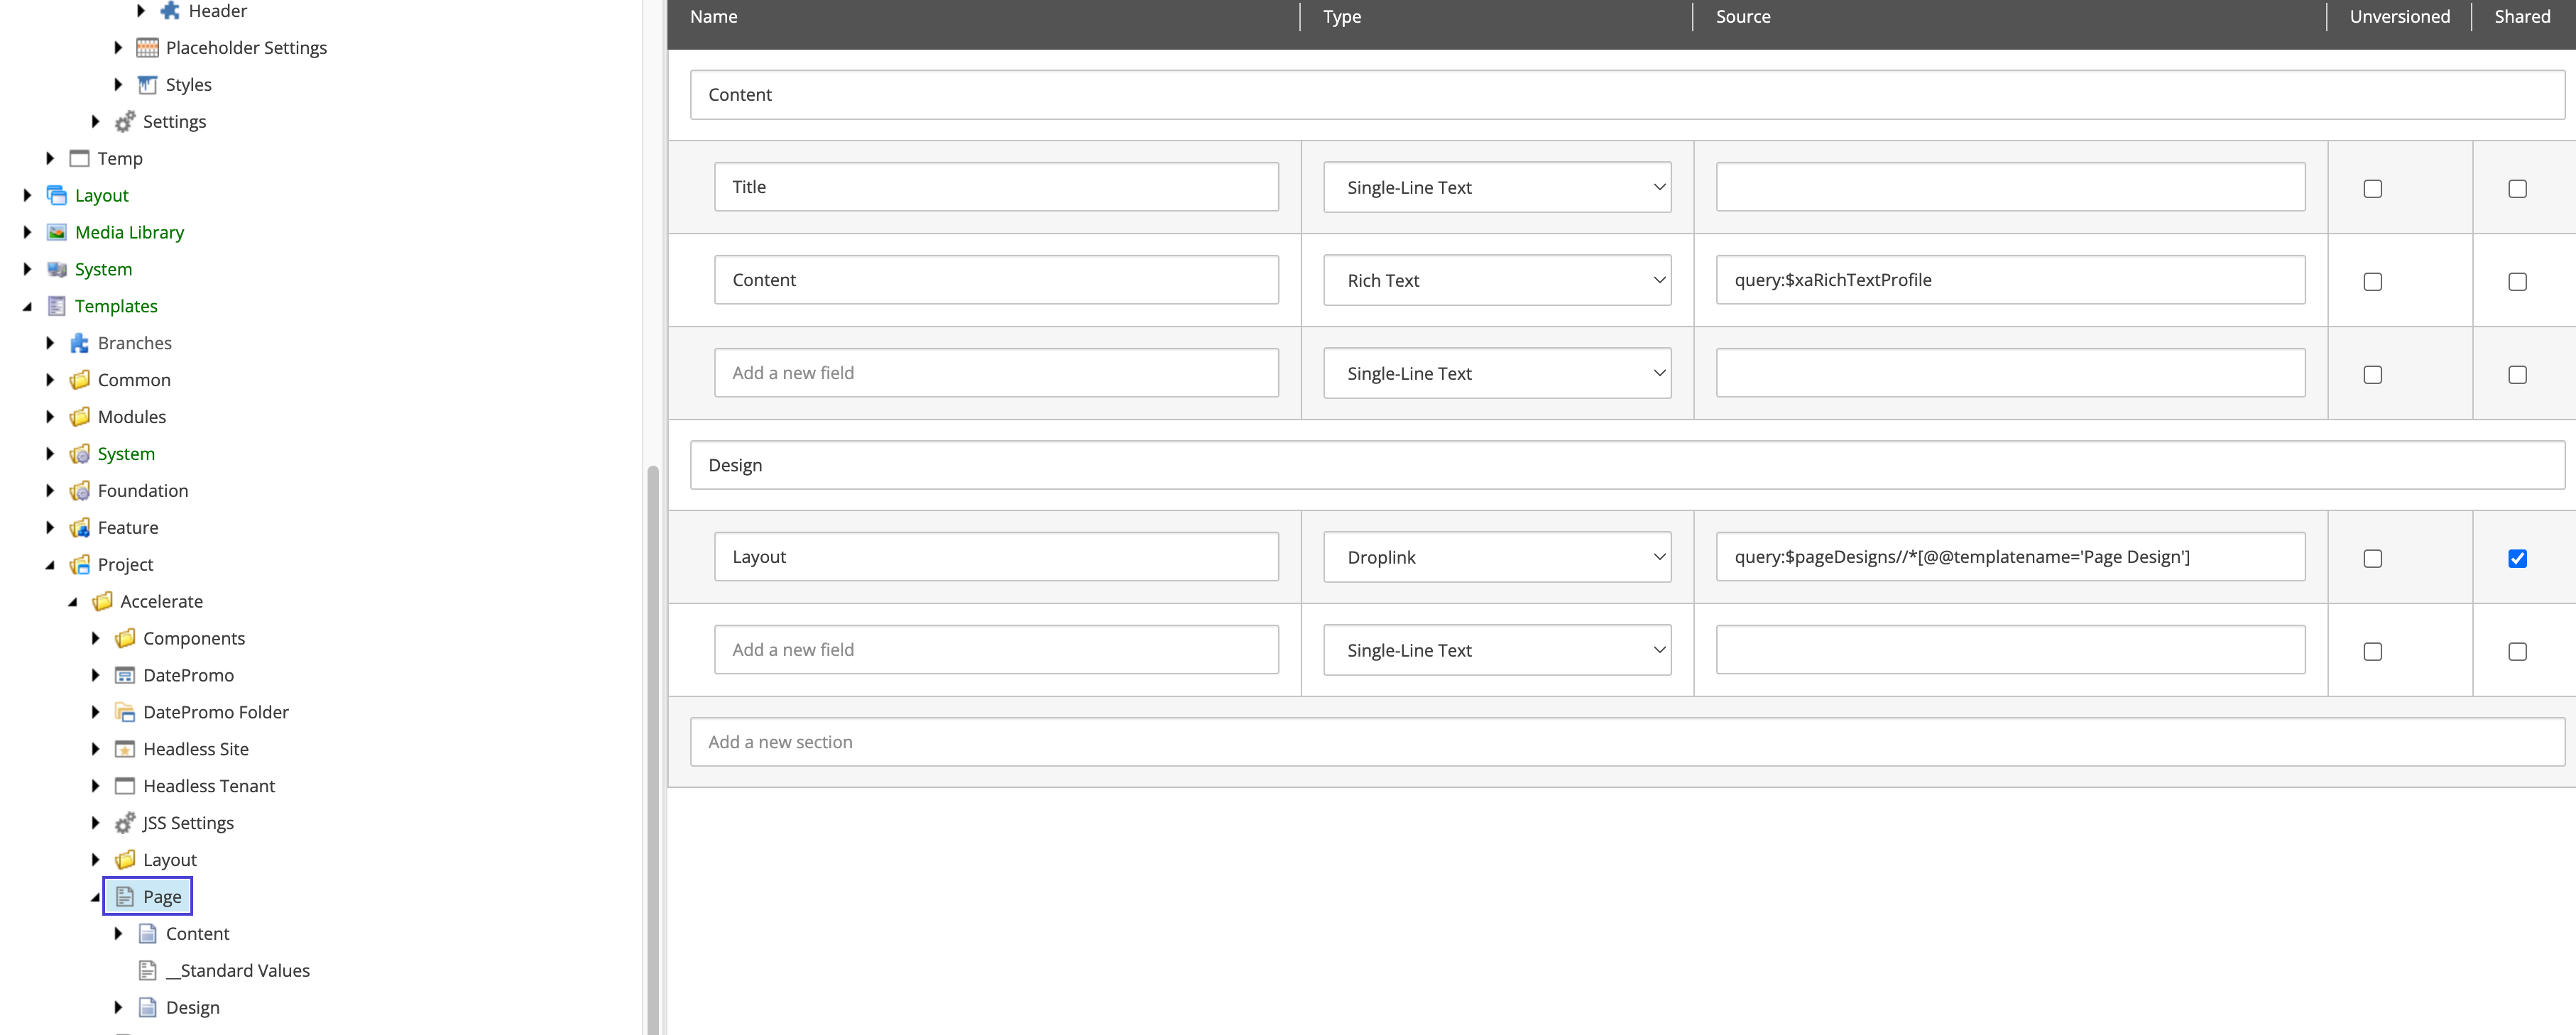
Now we need to add a new field to the base page template for your site collection. We will call this field LayoutRoute, is should be a droplink field. Make sure that Shared is ticked and that the Source property is set to query:$pageDesigns//*[@@templatename='Page Design'].

Now on each page we can specify which partial designs we want to use for the header and footer by setting the LayoutRoute field to the appropriate Page Design.
It is important to note that this approach does change the way that pages are composed in the head application. We are moving the responsibility of composing the page to the web application, and this means that the exiting experience changes slightly. At the time of writing, when an editor edits a page, they will not see the header and footer on the page due to the way the page data is pushed into the web application in preview mode. This problem is being worked on to make the editing experience identical to a standard page layout.
Consuming the Routes
Now that we have the layouts for the header and footer routers, we need to update the web application to consume these layouts and add the components to the page.
To do this, we can make use of the page-props-factory plugin pattern. We will create a new plugin that will be responsible for creating the page props for the header and footer and adding them to the main page props.
First we need to create a new service that will be responsible for fetching the layouts for the partial designs that we created earlier. We will call this service GraphQLLayoutRouteService. Create a new folder in the src/lib/page-props-factory folder and call it services. Inside this folder, create a new file called layout-route-service.ts. Here is the code for this service:
import { GraphQLClient } from '@sitecore-jss/sitecore-jss';
import { debug, GraphQLLayoutService, GraphQLLayoutServiceConfig, LayoutServiceData } from '@sitecore-jss/sitecore-jss-nextjs';

export class GraphQlLayoutRouteService extends GraphQLLayoutService {
  private myGraphQLClient: GraphQLClient;

  constructor(public serviceConfig: GraphQLLayoutServiceConfig) {
    super(serviceConfig);
    this.myGraphQLClient = this.getGraphQLClient();
  }

  public async fetchLayoutRoute(routeId: string, language: string): Promise<LayoutServiceData> {
    const query = this.getQuery(routeId, language);
    debug.layout('fetching layout route data for routeId: %s %s', routeId, language);

    const data = await this.myGraphQLClient.request<{
      item: { rendered: LayoutServiceData };
    }>(query);

    return data.item.rendered;
  }

  private getQuery(routeId: string, language: string) {
    return `query {
                item(path: "${routeId}", language: "${language}") {
                    rendered
                }
            }`;
  }
}
This service will use an item query to fetch the rendered layout data for the partial design item specified by the routeId.
Now we need to add a new plugin to the page-props-factory. In the src/lib/page-props-factory/plugins folder, create a new file called layout-routes.ts. Here is the code for this plugin:
import { ComponentRendering, HtmlElementRendering, Item } from '@sitecore-jss/sitecore-jss-nextjs';
import { SitecorePageProps } from 'lib/page-props';
import { GetStaticPropsContext, GetServerSidePropsContext } from 'next';
import config from 'temp/config';
import { Plugin } from '..';
import { GraphQlLayoutRouteService } from '../services/layout-route-service';
import clientFactory from 'lib/graphql-client-factory';

class LayoutRoutesPlugin implements Plugin {
  private layoutRequestClient: GraphQlLayoutRouteService;

  constructor() {
    const siteName = config.sitecoreSiteName;
    this.layoutRequestClient = new GraphQlLayoutRouteService({
      siteName,
      clientFactory,
      retries: (process.env.GRAPH_QL_SERVICE_RETRIES && parseInt(process.env.GRAPH_QL_SERVICE_RETRIES, 10)) as number,
    });
  }

  order = 2;

  async exec(props: SitecorePageProps, context: GetServerSidePropsContext | GetStaticPropsContext) {
    if (context.preview) {
      return props;
    }

    // get the layout route data from the page prop and then loop through the partial designs
    // to get the layout data for each partial design and add it to the page props
    const layoutRouteData = props?.layoutData?.sitecore?.route?.fields ? props?.layoutData?.sitecore?.route?.fields['LayoutRoute'] : [];
    const partialDesigns = ((layoutRouteData as Item)?.fields['PartialDesigns'] as Array<Item>) || [];
    await Promise.all(
      partialDesigns.map(async (partialDesign) => {
        const layoutData = await this.layoutRequestClient.fetchLayoutRoute(partialDesign.id?.toString() || '', props.locale);

        // this section could be cleaner and work out the placeholders more
        // dynamically.
        props?.layoutData?.sitecore?.route?.placeholders['headless-header'].push(...(layoutData.sitecore.route?.placeholders['headless-header'] as Array<ComponentRendering | HtmlElementRendering>));
        props?.layoutData?.sitecore?.route?.placeholders['headless-footer'].push(...(layoutData.sitecore.route?.placeholders['headless-footer'] as Array<ComponentRendering | HtmlElementRendering>));
      })
    );
    return props;
  }
}

export const layoutRoutesPlugin = new LayoutRoutesPlugin();
In this plugin we are using the Page Design selected in the LayoutRoute field to fetch the layout data for the page. We are then looping through the partial designs and fetching the layout data for each of them, and adding it to the page props for each specific placeholder. For the purposes of this recipe we have hard coded the headless-header and headless-footer placeholders. For a production implementation you may want to make this more dynamic and cope with other placeholders if needed.
Notice that we set the order property to 2. This makes sure that this plugin is executed after the normal-mode and preview-mode plugins. This is important because we need to make sure that the page props are set before the layout data is added to the page props.
Discussion
Rate limits
With this change, we are now hitting the Experience Edge API 3 times for each page. This will make it slower to generate the page, but should not affect rate limits negatively. The header and footer layout responses will be the same call for every page, this means that the call will be cached after the first request and then when each page is generated it would be returning the cached data for that route. Cached queries don't count toward the rate limit on Experience Edge, so this shouldn't have an impact.
Performance
Now that we are hitting the Experience Edge API 3 times per page, there is a potential performance impact. But because the header and footer layouts are the same per page, we can cache the responses in the web application for a short time, this would improve build and generation performance when a lot of pages are generated at the same time.
Updating the Header and Footer Content
With this approach, we can update the header and footer content on the site by updating the content of the corresponding partial designs. This means that instead of publishing the entire site, only the partial design and supporting datasource items that have changed need to be published, dramatically reducing the amount of time it takes to publish these changes to Experience Edge.
When being used on a statically generarted site, you will still need to regenerate all pages that use the header and footer to see the changes. The approach to do this will depend on the business requirements for the site and your chosen hosting provider.
- ISR: If you are using ISR, then as part of the regular ISR process, each page will be updated to use the new header and footer layouts as the revalidation period times out. This could lead to pages showing different content in the header and footer depending on where they are in the revalidation cycle.
- On Demand Revalidation: If you are using On Demand Revalidation, then you will need to regenerate the pages that use the header and footer to see the changes. Publishing the partial designs will not trigger a layout detail webhook for all pages. So in your code that responds to the Experience Edge
onupdatewebhook, you will need to check for the partial designs being updated and trigger a sitewide revalidation.
Sitewide revalidations can be very time consuming, so it is important to consider the impact of this approach. One way to reduce the impact would be to redeploy the current code to your site. When redeploying the current code, your pages will be regenerated, either on build or on first request after the deployment. Please check if your hosting provider completely clears the site cache on a redeploy. When taking this approach to a sitewide update, you should make sure that your builds are optimized by following the guidelines in this recipe: Experience Edge Rate Limits and Caching
Next Steps
This recipe highlights a new approach to page composition in XM Cloud. It should be considered a starting point for your project, you should validate the approach and adjust it to fit the needs of your project.